Custom web dashboard
Overview
In this tutorial, you will learn how to implement a simple web dashboard (interface) in vanilla JavaScript that integrates with the Kaa IoT platform and provides a simple device management functionality. You will learn how to:
- authenticate a user with the username/password in Keycloak and get his or her access token for usage in communication with the Kaa microservices’ REST API;
- retrieve all endpoints using EPR REST API by the user access token;
- display endpoint metadata;
- provide a user with the ability to manage endpoints by updating their metadata.

Prerequisites
- You have a web server for serving static HTML. In this tutorial, we use an Intellij Idea built-in web server. Nginx is another option.
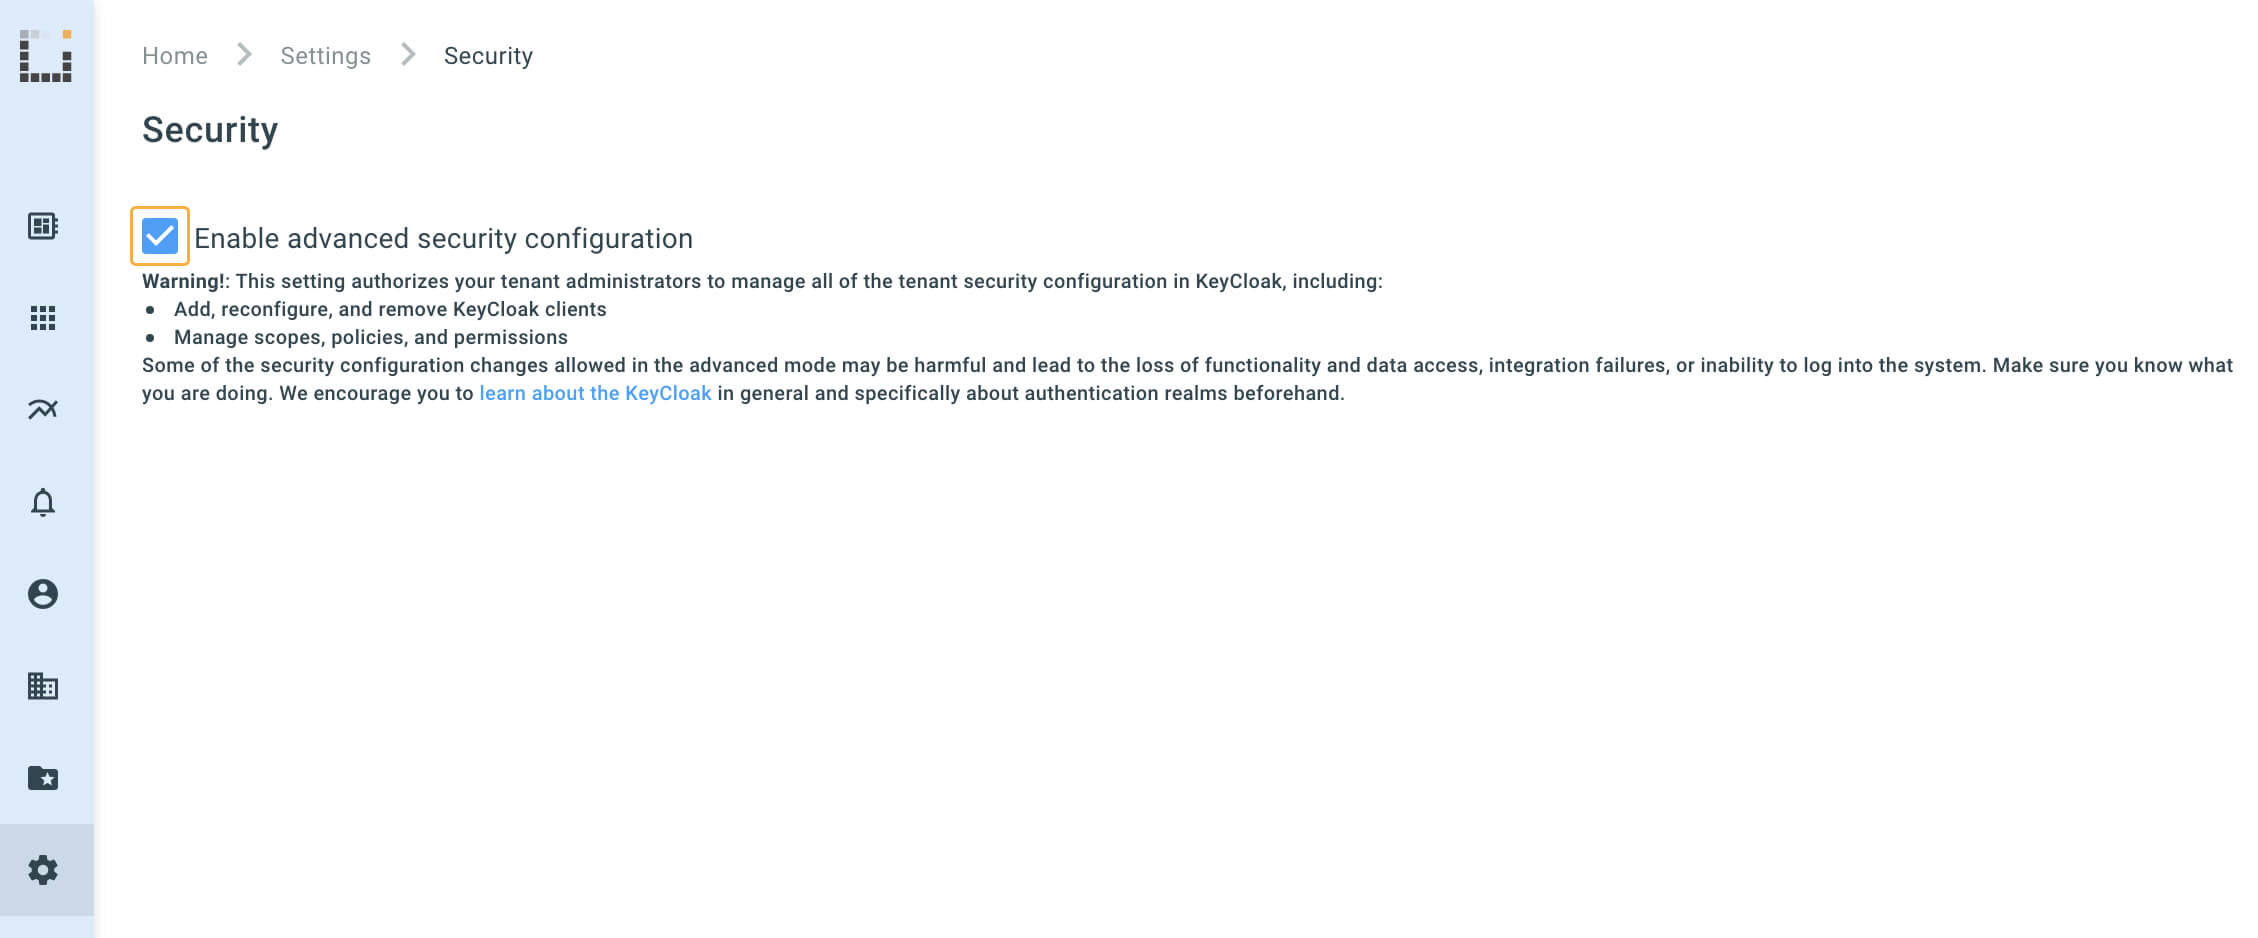
- Editing tenant settings is enabled in your Kaa Cloud account.
For this make sure that advanced security configuration is enabled under the Settings -> Security page in the Kaa Cloud UI.
- Keycloak has a configured client with the “openid-connect” in Client Protocol and “public” in the Access Type on its administration page: User management tab in the Kaa Cloud UI sidebar -> Clients in the Keycloak sidebar -> find client with the “kaa-frontend” client name in the clients list -> Settings tab.

- Keycloak has the
*value inValid Redirect URIsfor the development purpose. Remove*in production.
- Keycloak has the
*value inWeb Originsfor the development purpose. Remove*in production.
- There is a registered user in Keycloak whose credentials we will use.
Playbook
Keycloak comes with a client-side JavaScript library that can be used to secure HTML5/JavaScript applications.
The library can be retrieved directly from the Keycloak server at https://{keycloak-host}/auth/js/keycloak.js REST API endpoint.
The best practice is to load the JavaScript adapter programmatically directly from Keycloak Server as it will automatically be updated when you upgrade the server. Make sure you upgrade the adapter only after you have upgraded the server.
Let’s create a project folder and download the library into the file named keycloak.js:
$ mkdir custom-dashboard-tutorial/
$ cd custom-dashboard-tutorial/
$ curl https://{keycloak-host}/auth/js/keycloak.js >> keycloak.js
Once the library is downloaded, go to the Keycloak administration page of the client (User management sidebar link in the Kaa Cloud UI -> Clients in the Keycloak sidebar -> select client with the kaa-frontend name -> Settings tab), click on the Installation tab, select Keycloak OIDC JSON for the Format Option, and then click the Download button.
The downloaded keycloak.json file must be placed into the root project directory along with the keycloak.js.
The keycloak.json file contains Keycloak auth URL, information about realm, client ID, etc. Check it.
Your current project directory must look as follows:
custom-dashboard-tutorial/
  |--- keycloak.js
  |--- keycloak.json
Now let’s have fun with some coding :)
Create the index.html HTML file in the project root and paste the below code into it:
<html lang="en">
  <head>
    <script src="keycloak.js"></script>
  </head>

  Hello, user! You are logged-in!

  <script>
      var keycloak = new Keycloak();
      keycloak
      .init({onLoad: 'login-required'})
      .success(function() {
        // render page visible for a logged in user
        // renderApp(keycloak)
      }).error(function () {
        // log error
        // renderError('Failed to initialize Keycloak client');
      });
  </script>
</html>
Here we initialize the JavaScript adapter. Pay attention to the passed {onLoad: 'login-required'} option to the init method.
login-required will automatically authenticate the client if the user is logged in to the Keycloak or display the Keycloak login page if not.
Load to your web server index.html, open it in a browser, and verify that you are immediately redirected to the Keycloak login page:
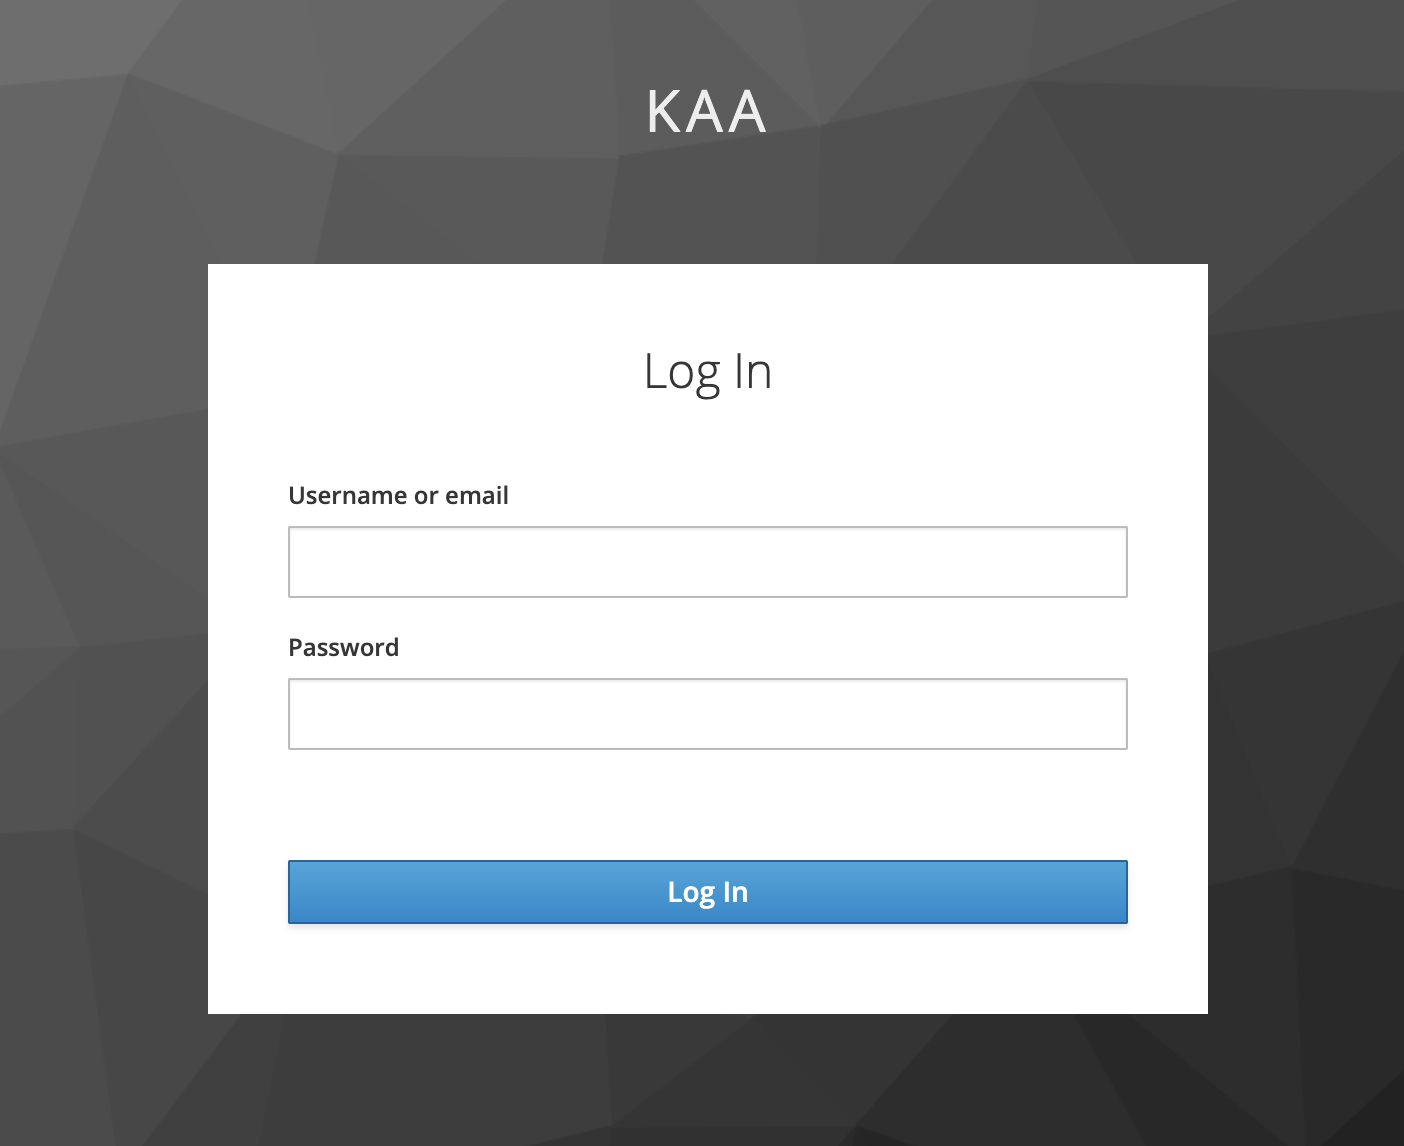
Enter your username/password and verify that you are redirected back to our web dashboard.

If the login process succeeds, the callback passed to the keycloak’s success method is called. In the callback, we will render the application for the logged in user.
However, if the login process fails, the callback passed to the keycloak’s error method is called. In the callback, we will notify the user about the error.
After the successful login process, the keycloak variable authenticates the user’s access token that can be obtained next: keycloak.token.
Now we can use the access token in subsequent requests to any Kaa platform microservice REST API specifying it in the Authorization header: Authorization: bearer eyJhbGciOiJSUzI1NiIsInR5cCIg...
Check tips below to find out how to manually obtain and use a user access token in requests to the Kaa microservices.
Next, create the index.js file in the project root. This file will contain application rendering logic.
Firstly, we will implement the renderApp method.
Here we call EPR GET /endpoints REST API with the access token obtained by the Keycloak adapter.
This REST API endpoint returns all available endpoints for a requesting user.
const baseKaaPlatformUrl = 'https://cloud.kaaiot.com'; // Specify the Kaa platform base URL

var renderApp = (keycloak) => {
  if (keycloak.token) {
    const url = `${baseKaaPlatformUrl}/epr/api/v1/endpoints?include=metadata`;
    const req = new XMLHttpRequest();
    req.open('GET', url, true);
    req.setRequestHeader('Accept', 'application/json');
    req.setRequestHeader('Authorization', `bearer ${keycloak.token}`);

    req.onreadystatechange = function () {
      if (req.readyState === 4) {
        if (req.status === 200) {
          renderEndpointTable(req.responseText);
        } else {
          renderError(`Failed to retrieve endpoints' metadata`);
        }
      }
    };

    req.send();
  } else {
    document.getElementById('container').innerHTML = `<button onclick="keycloak.login()">Login</button>`;
  }
};

var renderError = (errorMessage) => {
  document.getElementById('container').innerHTML = `<p style="color: red">${errorMessage}</p>`;
};
In the code above, if the access token is presented (keycloak.token is not undefined), it is used to retrieve endpoints, otherwise a Login button is rendered.
Now, let’s implement the renderEndpointTable method, which will render the retrieved from the previous step endpoints into an HTML table.
function renderEndpointTable(responseText) {
  const response = JSON.parse(responseText);
  let endpointRows = ``;
  for (const endpointInfo of response.content) {
    endpointRows = endpointRows + `
              <tr class="endpoint">
                <td class="endpointId">${endpointInfo.endpointId}</td>
                <td>${endpointInfo.appVersion.name}</td>
                <td><input class="location" type="text" value="${endpointInfo.metadata.location
                                                                 || ''}"></td>
              </tr>`
  }
  document.getElementById('table').innerHTML = endpointRows;
  document.getElementById('save-button').innerHTML =
      '<button onclick="saveEndpointLocation(keycloak)">Save location</button>';
}
The table displays an endpoint ID, its application version, and an endpoint location metadata field (you may want to introduce your own metadata field since the Kaa platform is agnostic to the endpoint metadata structure).
Let’s update index.html with the HTML of the table and add some styles to prettify it.
<html lang="en">
  <head>
    <link rel="stylesheet" type="text/css" href="style.css">
    <script src="keycloak.js"></script>
    <script src="index.js"></script>
  </head>

  <body>
    <div id="container">
      <table>
        <caption id="table-caption">My endpoints</caption>
        <thead>
          <tr>
            <th>Endpoint ID</th>
            <th>Application version</th>
            <th>Location</th>
          </tr>
        </thead>
        <tbody id="table">
        </tbody>
      </table>
    </div>
  </body>

  <script>
    var keycloak = new Keycloak();
    keycloak.init({onLoad: 'login-required'}).success(function() {
      renderApp(keycloak);
    }).error(function () {
      renderError('Failed to initialize Keycloak client');
    });
  </script>
</html>
Revisit the index.html in a browser (log in if needed) and verify that endpoint data is successfully retrieved.
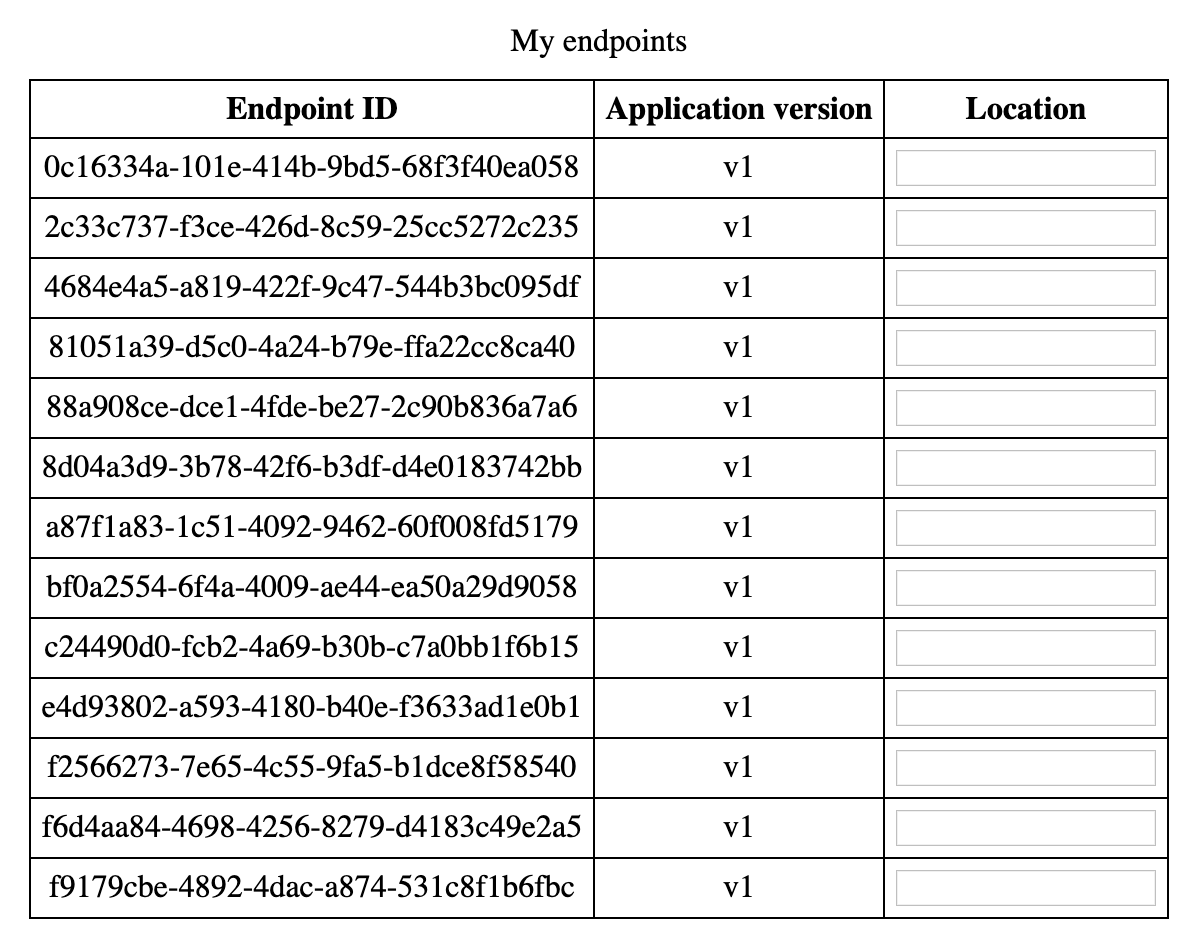
As you can see, there is no data in the Location column since none of the endpoints have the corresponding metadata field (in your case, it may be filled if endpoints do have such a metadata attribute). Jump below to change it.
Let’s expand our functionality to not only retrieving and displaying endpoint information but also updating it.
For that, go to the index.html and add the <p> tag above the closing </body> tag:
  ...
    <p id="save-button">
    </p>
  </body>
  ...
Add the saveEndpointLocation method to the index.js.
It sends an endpoint location entered by the user to the server using the EPR REST API.
var saveEndpointLocation = (accessToken) => {
  const endpointsInfo = document.getElementsByClassName('endpoint');
  for (const endpointInfo of endpointsInfo) {
    const endpointId = endpointInfo.getElementsByClassName('endpointId')[0].innerText;
    const updatedLocation = endpointInfo.getElementsByClassName('location')[0].value;
    // request execution
    const url = `${baseKaaPlatformUrl}/epr/api/v1/endpoints/${endpointId}/metadata/location`;
    const req = new XMLHttpRequest();
    req.open('PUT', url, true);
    req.setRequestHeader('Content-Type', 'application/json');
    req.setRequestHeader('Authorization', `bearer ${accessToken}`);
    req.send(JSON.stringify(updatedLocation));
  }
};
Pay attention to the req.setRequestHeader('Authorization', 'bearer ${accessToken}'); line.
Here we initialize the Authorization header with the user access token prefixed with the bearer .
Add rendering of the ‘Save changes’ button under the renderEndpointTable method invocation in the renderApp method.
...
if (req.status === 200) {
  renderEndpointTable(req.responseText);
  // 'Save changes' button rendering
  document.getElementById('save-button').innerHTML =
    '<button onclick="saveEndpointLocation(keycloak.token)">Save changes</button>';
} else {
  renderError(`Failed to retrieve endpoints' metadata`);
}
...
Revisit the index.html file in the browser, enter any endpoint location you want, and click the ‘Save changes’ button. It should save the entered location on the EPR service.
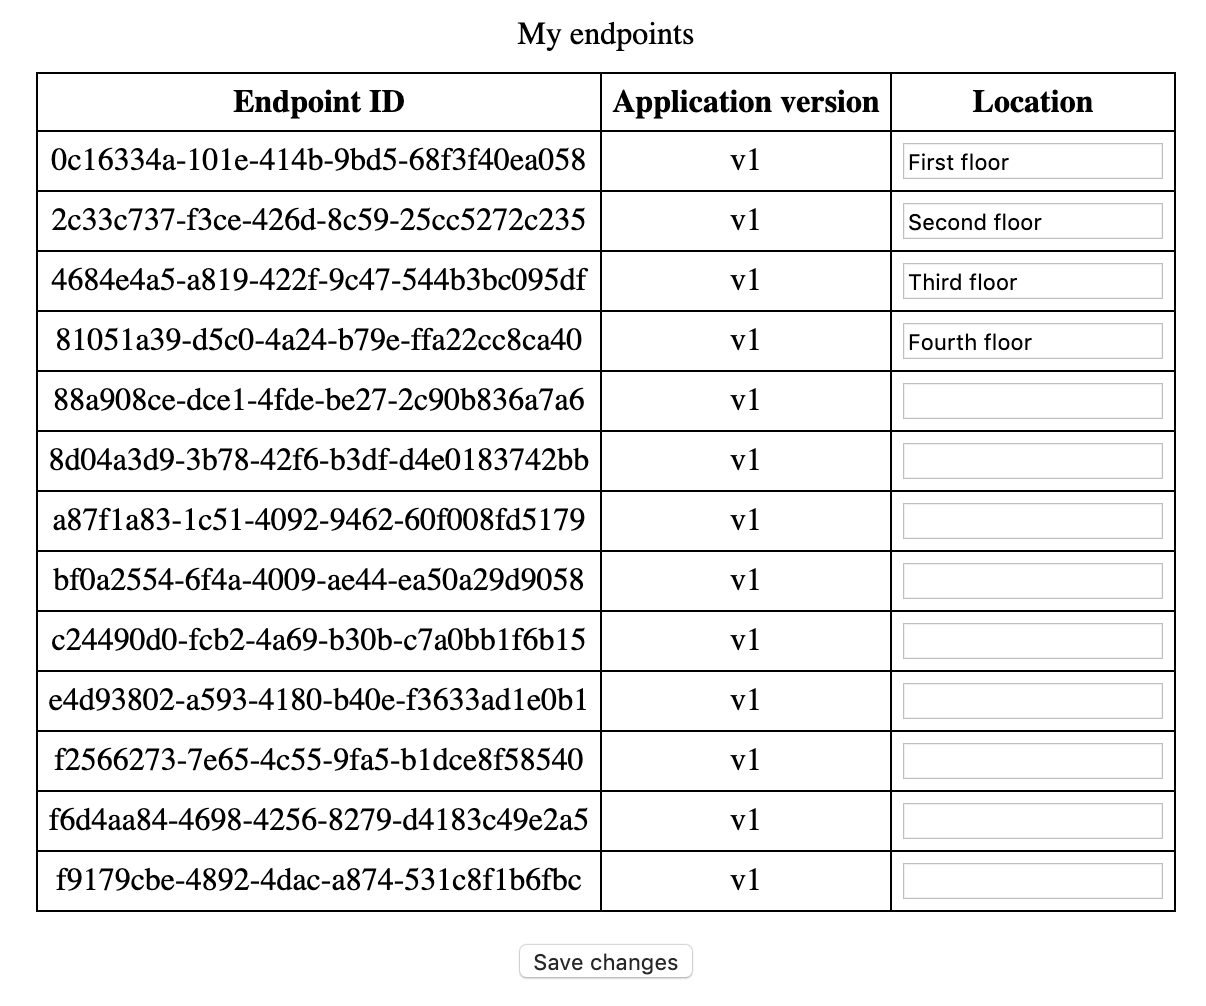
Refresh the page and verify that all the changes were saved.
Now you can use the same approach with the Authorization header to communicate with the Endpoint Time Series service, Endpoint Configuration Repository service, Credential Management service and other microservices with the REST API to operate with time series, configuration, credentials, etc.
Resources
All the tutorial resources are located on GitHub.
Tips
You can obtain the user access token manually. For that, execute the following CUrl command:
$ curl -X POST \
  https://{keycloak-host}/auth/realms/{realm}/protocol/openid-connect/token \
  -H 'Content-Type: application/x-www-form-urlencoded' \
  -d 'grant_type=password&client_id={client_id}&username={username}&password={password}'

{"access_token":"eyJhbGciOiJSUzI1NiIsInR5cCIg..."
Use the value of the access_token field as the access token by prefixing it with the bearer in requests to the Kaa platform microservices REST API.
EPR GET /endpoints example:
$ curl https://{kaa-platform-host}/epr/api/v1/endpoints \
  -H 'Authorization: bearer eyJhbGciOiJSUzI1NiIsInR5cCIg...'

{"totalElements":1,"content":[{"endpointId":"0de07db5-5d40-4108-8cf3-1aee344b4aef"...
EPTS GET /time-series/config example:
$ curl https://{kaa-platform-host}/epts/api/v1/time-series/config \
  -H 'Authorization: bearer eyJhbGciOiJSUzI1NiIsInR5cCIg...'

{"demo_application":[{"name":"temperature","values":["temp"]}...