Collecting data from a device
Based on the Kaa v1.2.
Time to complete: 10 min.
Overview
Welcome to the second tutorial in the Kaa getting started guide! We assume that you have successfully connected your first device to Kaa, so make sure to review the first tutorial before proceeding here.
From this tutorial you will learn some additional concepts of the Kaa platform and discover how to:
- collect telemetry data from a device
- transform raw telemetry data into well-structured time series
- use the time series auto-extraction feature
- visualize time series data on the Kaa UI
Terms and concepts
Let us start by reviewing some new terms and concepts related to the Kaa data collection feature.
Data sample
Think of data sample as a block of data in JSON format that a client sends to the platform for data collection.
Let’s consider an example.
You have a greenhouse monitoring station that consists of temperature, humidity and light sensors, and a gateway (e.g. Arduino) that all sensors are connected to. Every minute Arduino polls all connected sensors for their current values. Then the Arduino formats sensor values into a JSON object: this is a data sample.
{
  "temperature": 25,
  "humidity": 46,
  "lux": 8600
}
Time series
Time series is a named sequence of data points. Each data point contains a timestamp and one or more named values. A set of value names and their types (numeric, string, boolean) defines a time series.
You may want different time series defined for various things.
For example, a fuel level time series may only have one numeric value: level.
On the other hand, a geo-location time series may have several numeric values: latitude, longitude, and in some applications altitude.
You can configure Kaa to transform data samples received from endpoints into time series for displaying them on charts, gauges, maps, etc. The microservice responsible for extracting data points from data samples, storing and retrieving them, is the Endpoint Time Series service (EPTS). It can use a timestamp present in a data sample or use a data sample receipt timestamp. For simplicity, in this tutorial we will use data receipt timestamps.
Also, EPTS has an auto-extraction feature that stores each numeric top-level data sample field into a separate time-series.
All auto-extracted time series have a name that follows the pattern auto~<field name> and one numeric value with the name value.
So, if your endpoint sends data a sample with two fields, e.g.:
  {
    "temperature": 23,
    "humidity": 48
  }
and the auto-extraction feature is enabled, EPTS creates two time-series: auto~temperature and auto~humidity.
Let’s now send some data to Kaa and see the auto-extraction feature in action.
Playbook
We assume that you have already created an application, application version, and endpoint with a token while following the “connecting your first device” tutorial. You can reuse them or create new ones.
Start by logging into your Kaa Cloud account.
Enable the time series auto-extraction
To keep things simple, at this time we will not define any configurable time series, but rather just use the EPTS auto-extraction feature. Let us make sure that it is turned on in your application. Go to the Device management -> Applications -> expand your application -> select “epts” and enable the “Autoextract” checkbox.
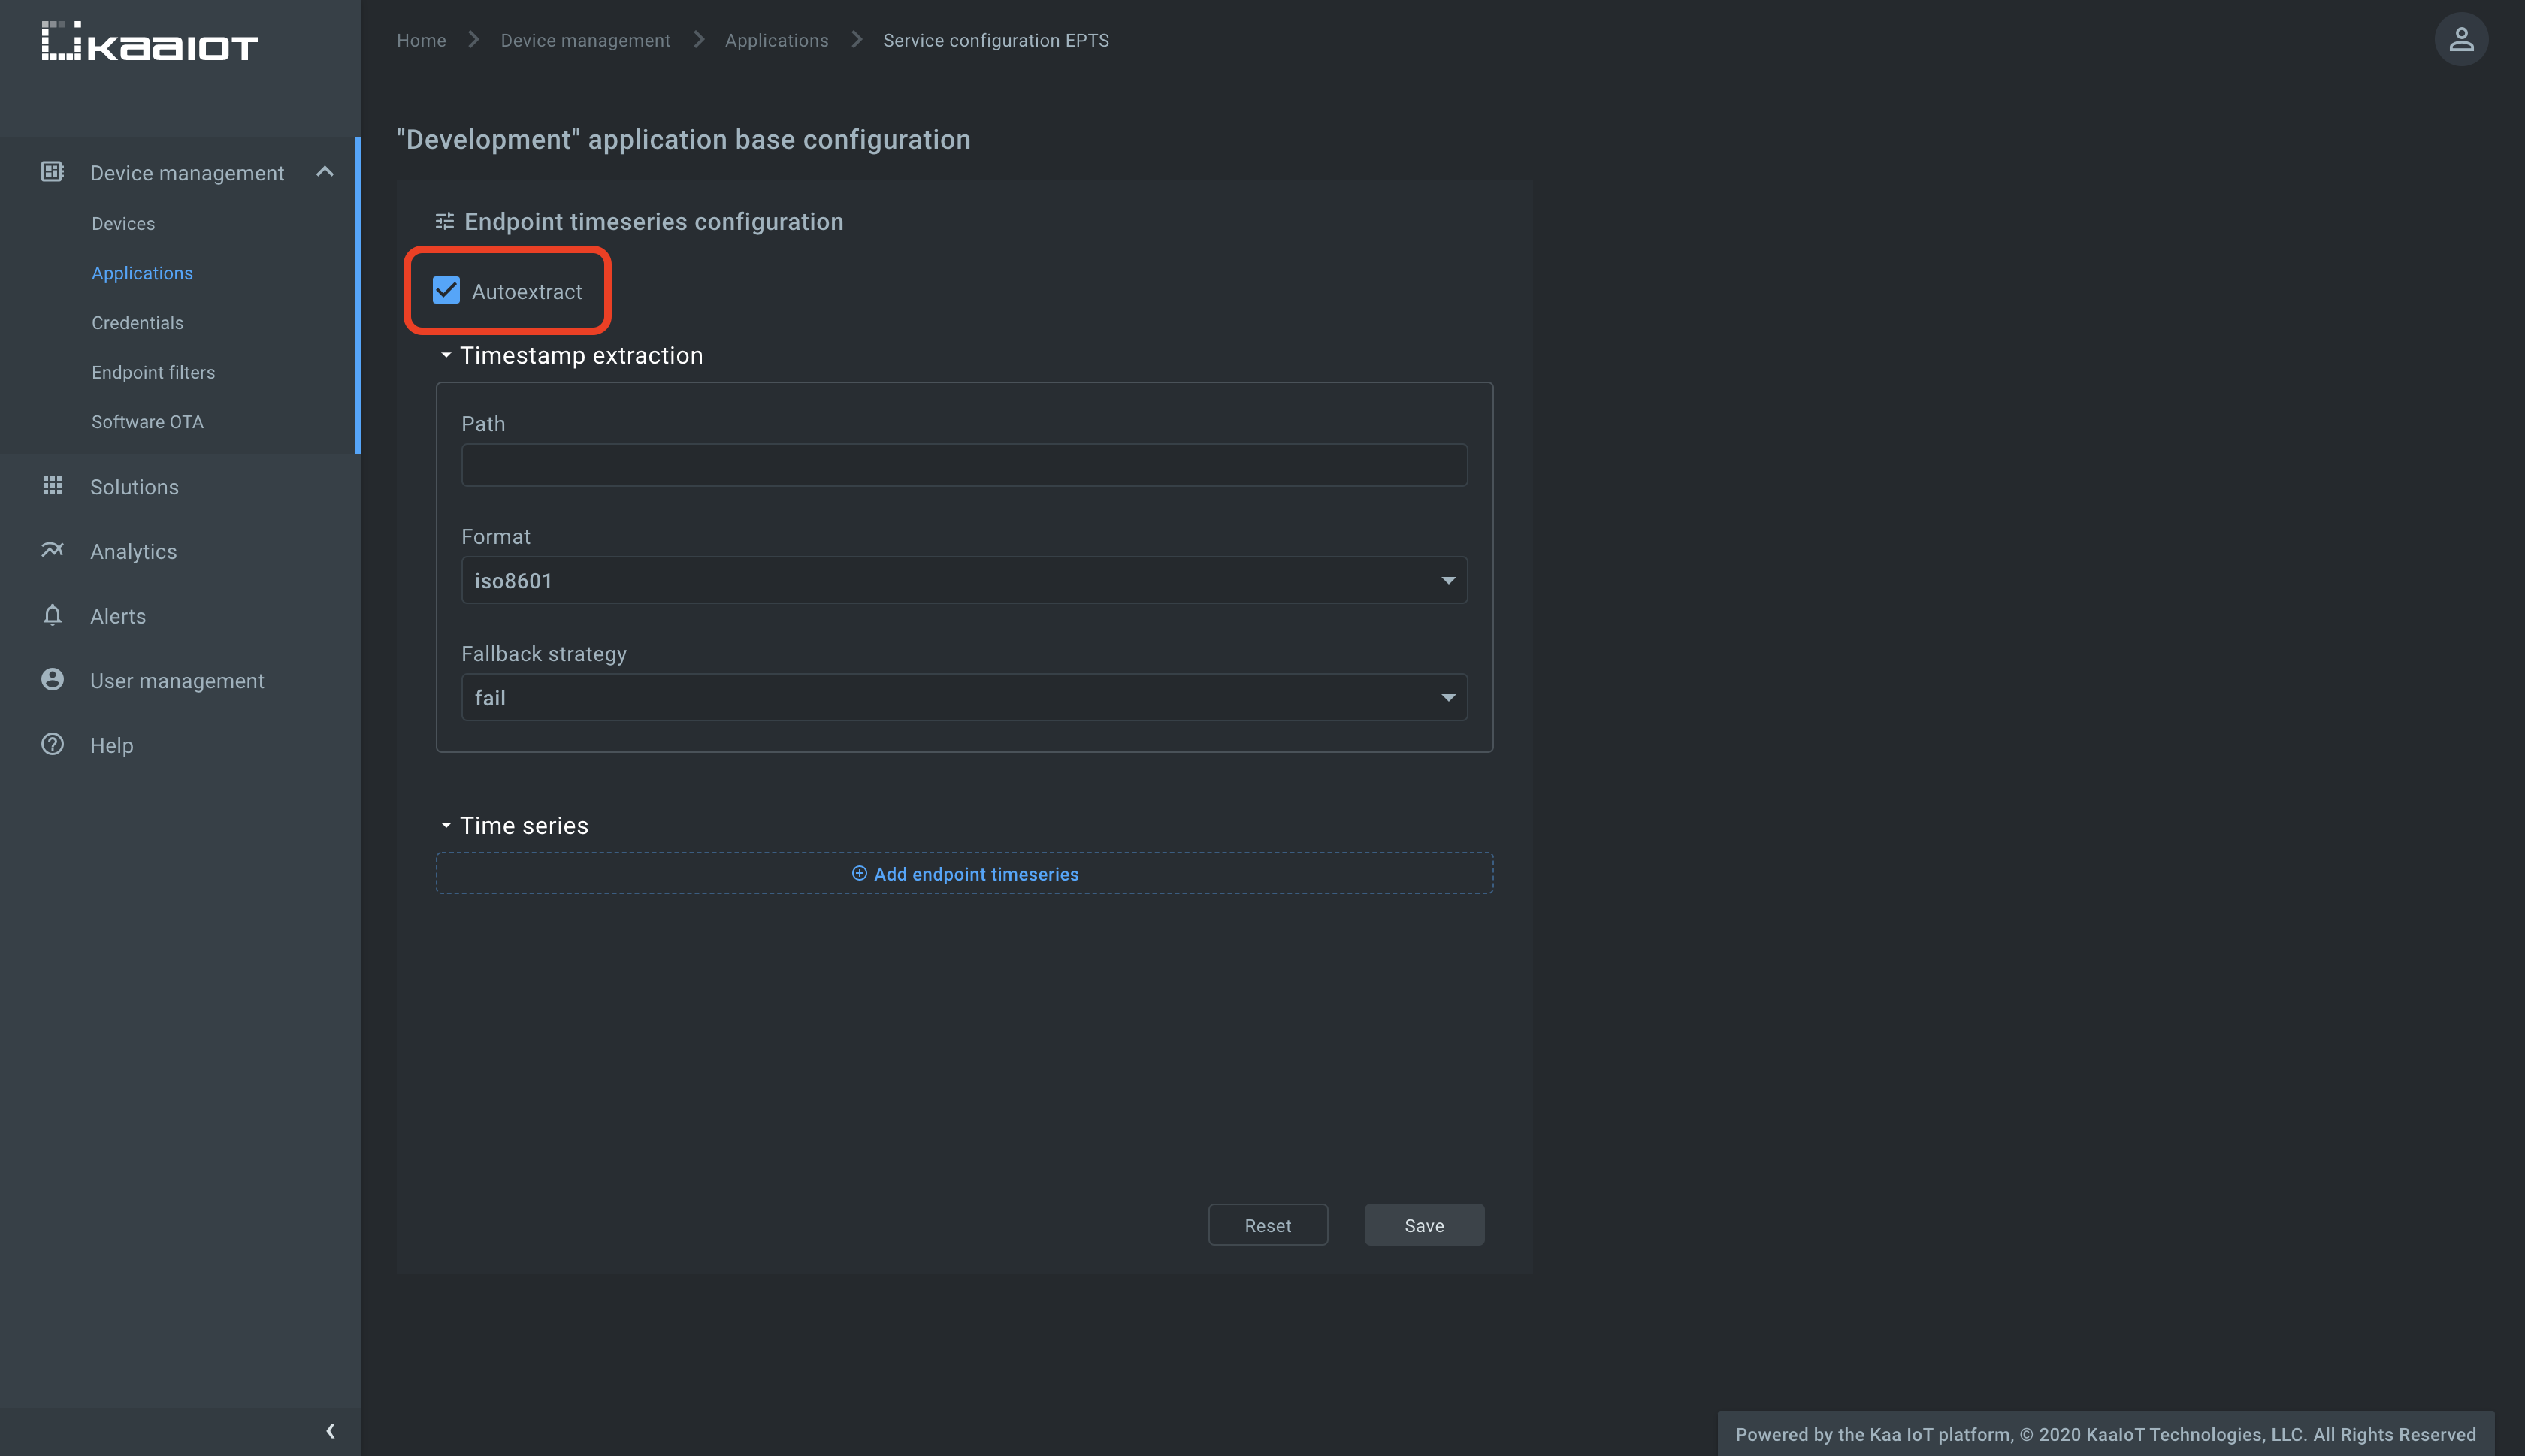
With this function enabled, Kaa will automatically create a time series for each numeric field it encounters at the root of data samples your endpoints in this application will submit. You will then be able to view these time series in Kaa UI, no extra configuration required.
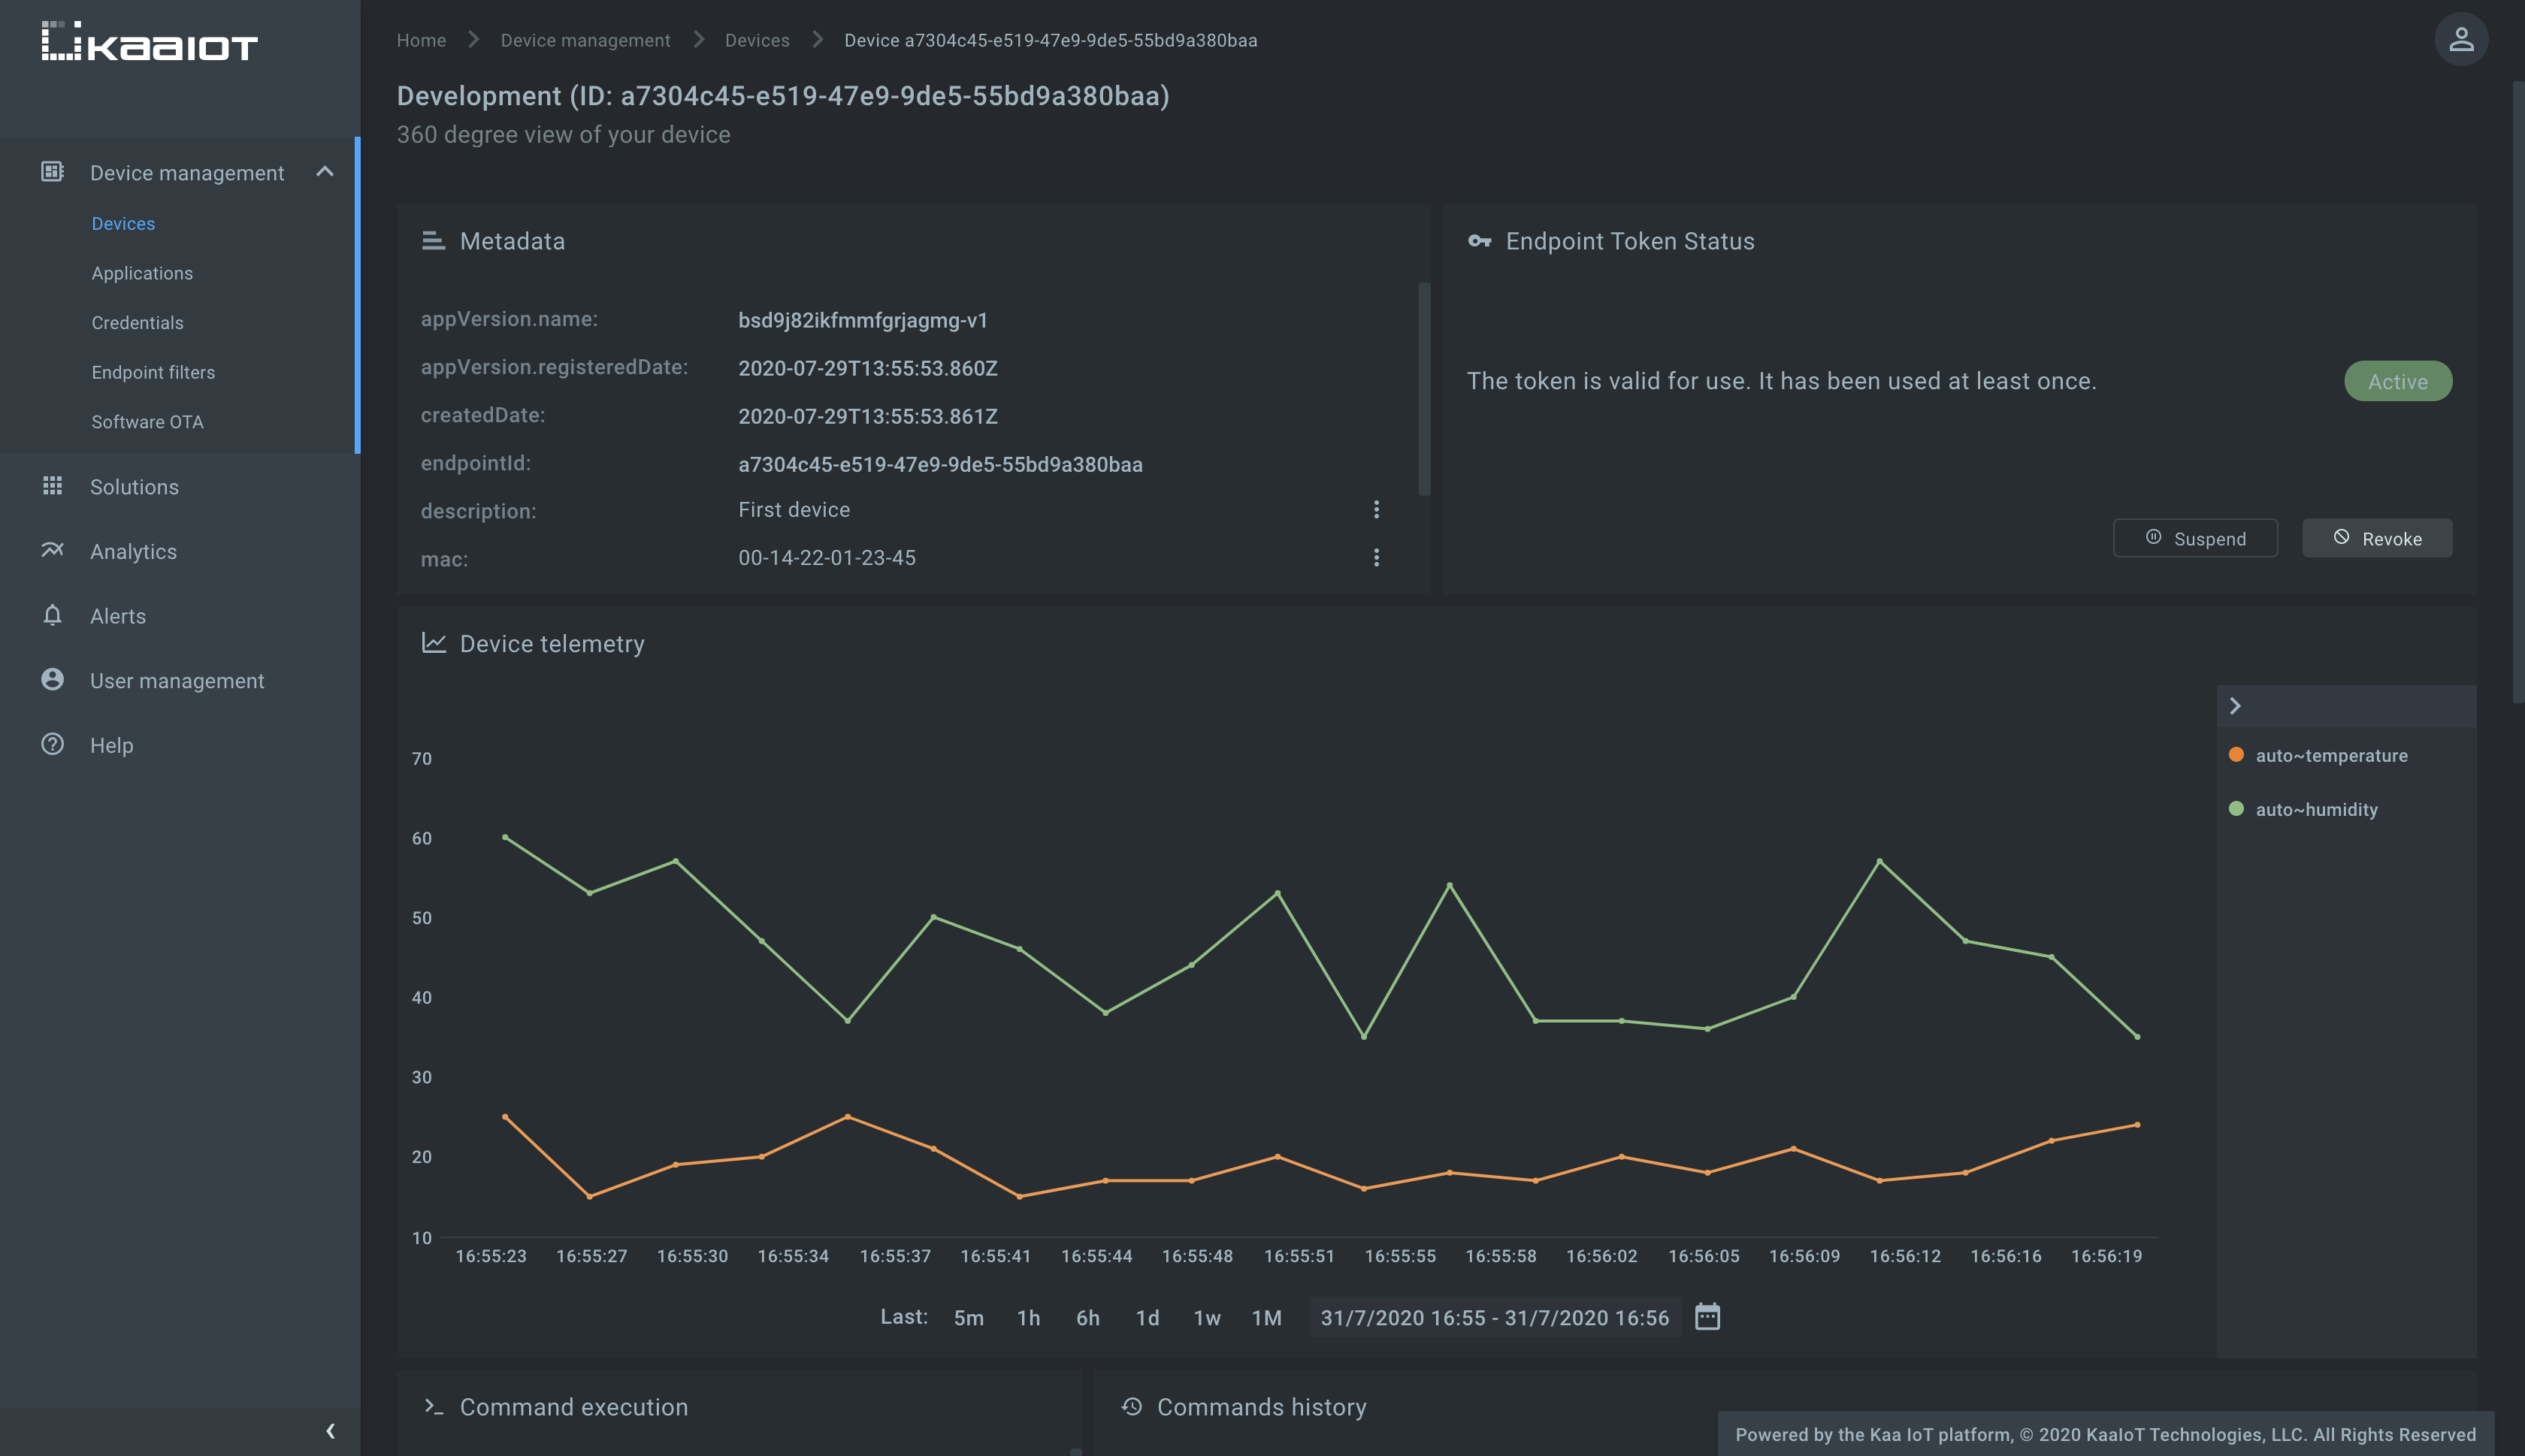
Go to the pre-defined endpoint dashboard and scroll to the “Device telemetry” widget. (The endpoint dashboard is available from Device management -> Devices -> select your endpoint in the list.) Now we are all set to send our first data sample to the platform.
Send data samples
You can submit telemetry data via a variety of MQTT- and HTTP-based interfaces. Let’s take a look at a couple of the simplest ones: plain HTTP and plain MQTT.
Execute the below cURL command to send one data sample with temperature and humidity fields.
You can run this command several times to get multiple data points shown as a line in the Kaa UI.
Remember to replace <app-version-name> and <endpoint-token> with your application version name and the endpoint token respectively.
curl --location --request POST 'https://connect.cloud.kaaiot.com:443/kp1/<app-version-name>/dcx/<endpoint-token>/json' \
--data-raw '{
  "temperature": 23,
  "humidity": 48
}'
To run the below MQTT client on your PC, you will need Python 3 installed. To speed things up a little, you can also just open and run it on Replit.com.
Remember to initialize APPLICATION_VERSION and ENDPOINT_TOKEN variables your application version name and the endpoint token respectively.
# Simple MQTT-based data collection client for the Kaa IoT platform.
# See https://docs.kaaiot.io/KAA/docs/current/Tutorials/getting-started/collecting-data-from-a-device/.

import json
import random
import signal
import string
import time

import paho.mqtt.client as mqtt

KPC_HOST = "mqtt.cloud.kaaiot.com"  # Kaa Cloud plain MQTT host
KPC_PORT = 1883                     # Kaa Cloud plain MQTT port

ENDPOINT_TOKEN = ""       # Paste your endpoint token
APPLICATION_VERSION = ""  # Paste your application version


class DataCollectionClient:

    def __init__(self, client):
        self.client = client
        self.data_collection_topic = f'kp1/{APPLICATION_VERSION}/dcx/{ENDPOINT_TOKEN}/json'

    def connect_to_server(self):
        print(f'Connecting to Kaa server at {KPC_HOST}:{KPC_PORT} using application version {APPLICATION_VERSION} and endpoint token {ENDPOINT_TOKEN}')
        self.client.connect(KPC_HOST, KPC_PORT, 60)
        print('Successfully connected')

    def disconnect_from_server(self):
        print(f'Disconnecting from Kaa server at {KPC_HOST}:{KPC_PORT}...')
        self.client.loop_stop()
        self.client.disconnect()
        print('Successfully disconnected')

    def compose_data_sample(self):
        return json.dumps({
            'timestamp': int(round(time.time() * 1000)),
            'temperature': random.randint(15, 25),
            'humidity': random.randint(35, 60),
        })


def on_message(client, userdata, message):
    print(f'<-- Received message on topic "{message.topic}":\n{str(message.payload.decode("utf-8"))}')


def main():
    # Initiate server connection
    client = mqtt.Client(client_id=''.join(random.choice(string.ascii_uppercase + string.digits) for _ in range(6)))

    data_collection_client = DataCollectionClient(client)
    data_collection_client.connect_to_server()
    client.on_message = on_message

    # Start the loop
    client.loop_start()

    # Send data samples in loop
    listener = SignalListener()
    while listener.keepRunning:

        payload = data_collection_client.compose_data_sample()

        result = data_collection_client.client.publish(topic=data_collection_client.data_collection_topic, payload=payload)
        if result.rc != 0:
            print('Server connection lost, attempting to reconnect')
            data_collection_client.connect_to_server()
        else:
            print(f'--> Sent message on topic "{data_collection_client.data_collection_topic}":\n{payload}')

        time.sleep(3)

    data_collection_client.disconnect_from_server()


class SignalListener:
    keepRunning = True

    def __init__(self):
        signal.signal(signal.SIGINT, self.stop)
        signal.signal(signal.SIGTERM, self.stop)

    def stop(self, signum, frame):
        print('Shutting down...')
        self.keepRunning = False


if __name__ == '__main__':
    main()
Feel free to play with the client and use it as a reference for your client integration.
Verify that the auto~temperature and auto~humidity time series appeared on the right side of the “Device telemetry” chart and the chart is filled with data points.
Resources
All the tutorial resources are located on GitHub.
Feedback
This tutorial is based on Kaa 1.2 released on July 6-th, 2020. If you, our reader from the future, spot some major discrepancies with your current version of the Kaa platform, or if anything does not work for you, please give us a shout and we will help!
And if the tutorial served you well, we’d still love to hear your feedback, so join the community!